Creating a Dot Net Core 3.1 WebAPI with OpenAPI, Swagger UI using CLI on VS Code

INTRODUCTION
While creating a WebAPI using .NET Core you get many tools to ease your work and focus yourself on actual code. Long gone are the days where you needed to download IDEs in size of GBs and use third party API clients for testing just to write 50 lines of logic for your REST API.
A simple way to overcome this challenge is to create a REST API using .NET Core with the support of Swagger. You’ll see how easy it is to work with Open API Swagger UI in ASP.NET Core.
What is the difference between OpenAPI and Swagger?
Many of you might be thinking that these are the two different applications we can use to test/document our REST API like I did before I came across this article by smartbear.
Even on some official documentation, the terms OpenAPI, and Swagger often used interchangeably raising probable confusion among us. In layman's terms, OpenAPI is a specification used to build a set of both open source and commercial tools like Swagger. Swagger UI is one of the Open Source tools from SmartBear that uses the OpenAPI specification.
Let us start building a new WebAPI Project
Assuming you have .net core 3.1 SDK installed on your system, open Visual Studio Code and open the system terminal. You can also use VSCode’s integrated terminal by pressing control plus backquote key(key below escape) i.e. ctrl+`.
Type the following commands to create a new web API project:
dotnet new webapi -o <project_name>(Optional) We can force use .net core version 3.1 by adding -f and SDK version to command as:
dotnet new webapi -o swaggertest -f netcoreapp3.1After the project files have been created, open the project in vs code and press ctrl+F5 to run it.
(Optional) You can also use the following commands to run the project without debugging:
dotnet build
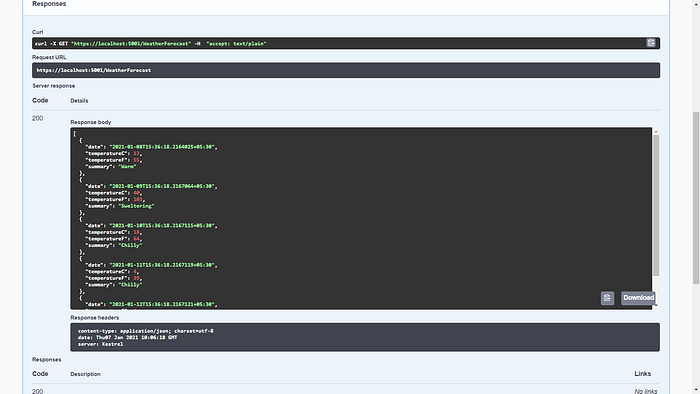
dotnet runOnce the project is running, navigate to https://localhost:5001/weatherforecast from your browser. It should return the JSON result similar to this:
And voila, your base REST API is up and running.
Now adding swagger to this project

Let's add swagger to our project via the Swashbuckle NuGet package. Type the following command in CLI:
dotnet add package Swashbuckle.AspNetCoreConfirm the installation by opening your projects .csproj file, it should contain the following references:
<ItemGroup>
 <PackageReference Include=”Swashbuckle.AspNetCore” Version=”5.6.3"/>
</ItemGroup>
Once this is done, modify your Startup.cs file to add the following swagger methods:
- In the ConfigureServices method of Startup.cs add
services.AddSwaggerGen(c => {
c.SwaggerDoc(“v1”, new OpenApiInfo { Title = “swaggertest API”, Version = “v1” });
});
2. In the Configure method of the same file add
app.UseSwagger();app.UseSwaggerUI(c => {
c.SwaggerEndpoint(“/swagger/v1/swagger.json”, “swaggertest API V1”);
});
In case of openApiInfo error, add the following namespace in the same file
using Microsoft.OpenApi.Models;
After this, your Startup.cs should look like this:
Run the code and navigate to https://localhost:5001/swagger/index.html
You’ll see the swagger page with all the endpoints listed.
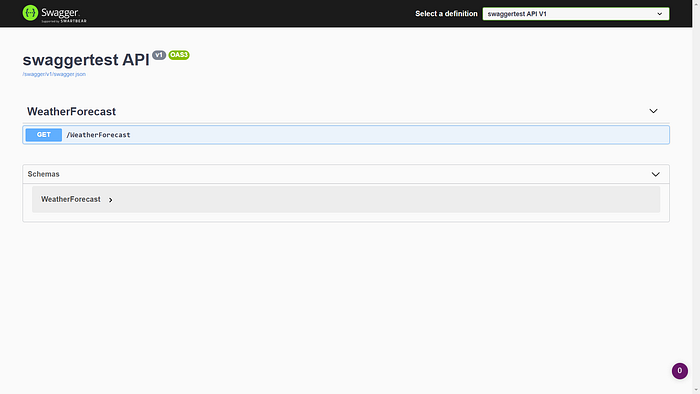
Now when you click on the precoded /weatherforecast GET method and click the Try it out button, swagger will call the API and return the result in an informative and readable manner.
Adding your own API Endpoints
Adding your own API endpoints is as easy as writing a method in your controller. Add your own controllers and add HTTP attributes over the methods, and swagger will automatically update the documented APIs list.
Try it with different methods like PUT, OPTIONS, DELETE.
I have added a DummyController in the project for reference, you can find the source code on https://github.com/elpidaguy/swaggertest
Conclusion
.NET Core regardless of its ascending learning curve, with tools like swagger, helps developers to focus more on logic and save time. Using these will help a developer write a well-documented APIs within lesser time.